
Springtime is finally here, so it’s time for you to ditch those moody winter shades and update your nails with the best of what the Spring nail collections has to offer. It’s not just about new Spring nail colours, with so many nail designs to pick from, you’ve probably scrolled through hundreds of inspo pics on Instagram and wondered “how can I do it”? Don’t worry, because we have four spring inspired nail art ideas that prove you don’t have to be a professional nail artist to recreate them. Just follow our easy step-by-step guides and you’ll be inspired to unleash your creativity throughout the whole season.
Spring nail art inspo to try at home
Rainbow nails
Bright rainbow nails are always an easy way to welcome brighter days, and this trend is so easy because all you need are your favourite colours. If you’re stuck for rainbow nail art ideas, try our cute pastel look using the new Stay Woke collection from 2AM London. Perfect for creating quick and easy gel manicures, this collection’s 100% vegan formulas cure in just 30 seconds and last up to three weeks.
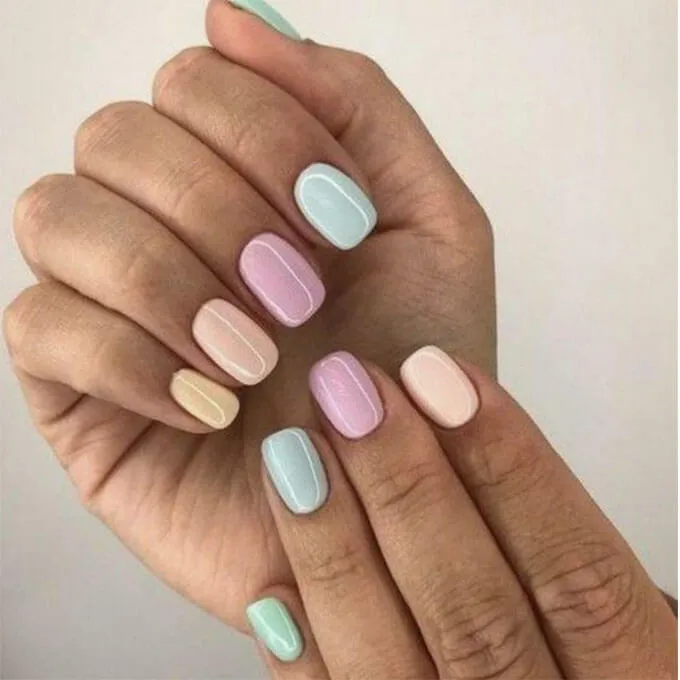
Pastel rainbow nail art tutorial
You will need:
• 2AM London Gel Polish Base Coat - First Base
• 2AM London Gel Polish Top Coat - Get On Top
• The following 2AM London Stay Woke shades:
o Be Self Aware
o Finding Hope
o Kindness is Cool
o Take Action Now
o Listen Up
• ASP Signature Mini LED Lamp
Step One
Cleanse, file and buff your nails before applying a thin layer of the 2AM London First Base Coat. Cure your nails under your LED lamp for 30 seconds.
Step Two
Apply two thin coats of the 2AM London Stay Woke Gel Polish in the
following order, curing each coat under your LED lamp for 30 seconds:
• Be Self Aware on the thumb
• Finding Hope on the index finger
• Kindness is Cool on the middle finger
• Take Action Now the ring finger
• Listen Up on the pinky finger
Step Three
Finish off your gel rainbow nails with the 2AM London Get On Top Coat, giving them one final curing under your LED lamp for 30 seconds.
Shop the 2AM collection now

€ 12,59
<ul><li>Hema Free</li><li>Apply with or without 2AM London Base Coat, simply prep the nails as normal</li><li>2AM London Gel Colour and Top Coat can be applied ontop</li><li>Smooth application and consistency</li><li>100% Vegan friendly</li></ul>
Offer

€ 11,39
<ul><li>Perfect for building strength and reaching new lengths</li><li>12 different sizes in a natural nail shape</li><li>Top quality, lightweight ABS plastic</li><li>Easy to use</li><li>Use with 2AM London Build It Baby Builder Gel</li></ul>
Polka dots
If you’re tired of the same plain shades, adding some polka dots gives your spring nails an instant makeover. What makes polka dots a standout nail design is that you have the freedom to mix and match the dot sizes, placements and colours to suit any occasion. Inspired by spring blossoms, try our cute pink and white polka dot nail art tutorial using some of our favourite OPI Infinite Shine shades!
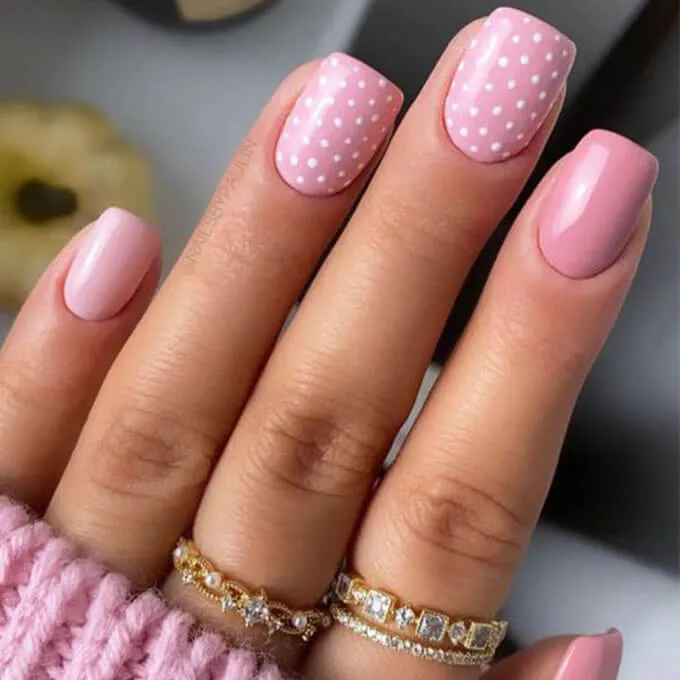
Polka dot nail tutorial
You will need:
• OPI Infinite Shine ProStay Easy Apply & Long-lasting Primer Base
Coat
• Salon Services Dotting Tool Set
• The following OPI Infinite Shine Nail Lacquers:
o Two-Timing The Zones
o Girl Without Limits
o Alpine Snow
• OPI Infinite Shine ProStay Easy Apply & Long-lasting Gel Effect
Gloss Top Coat
Step One
Cleanse, file and buff your nails before applying the OPI Infinite Shine ProStay Easy Apply & Long-lasting Primer Base Coat.
Step Two
Switching between nails, apply two thin coats of the OPI Infinite Shine Lacquer in Girl Without Limits and Two-Timing The Zones. Leave to dry and apply a thin layer of OPI Infinite Shine ProStay Easy Apply & Long-lasting Gel Effect Gloss Top Coat.
Step Three
With the Salon Services Dotting Tool and OPI Infinite Shine Lacquer in Alpine Snow, apply the desired number of polka dots on your nails and leave to dry.
TOP TIP: If you’re unsure about what sized polka dots you want, test them on a piece of paper before applying.
Step Four
Finish off your cute polka dot nails with a thin layer of the OPI Infinite Shine ProStay Easy Apply & Long-lasting Gel Effect Gloss Top Coat.
Shop the shades to create your spring polka dots
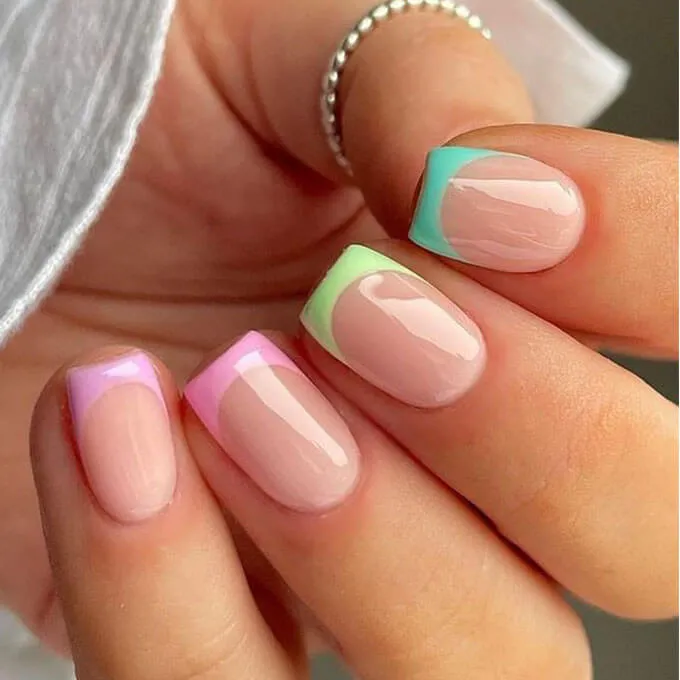
Neon French tips
The classic French manicure is getting a neon upgrade. A favourite of celebrities and influencers across social media, switching from the usual white to fluorescent yellows, lime greens and electric pinks instantly gives your nails cool summer vibes. This simple design is easy to do at home, so try our cute pink and purple neon French tips using the brand new OPI XBOX Play the Palette Collection. Inspired by the world of video games, this collection takes your manicure to the next level with twelve eye-catching shades perfect for creating bright summer nails.
Neon French tips tutorial
You will need:
• OPI Infinite Shine ProStay Easy Apply & Long-lasting Primer Base
Coat
• ASP Nail Art Brushes Pack of 4
• The following OPI Infinite Shine Nail Lacquers:
o Bubble Bath
o Racing Pinks
o N00Berry
o Alpine Snow (optional)
• OPI Infinite Shine ProStay Easy Apply & Long-lasting Gel Effect
Gloss Top Coat
Step One
Cleanse, file and buff your nails before applying a thin layer of the OPI Infinite Shine ProStay Easy Apply & Long-lasting Primer Base Coat.
Step Two
Apply two thin layers of the OPI Infinite Shine Nail Lacquer in Bubble Bath and leave to dry. Apply a thin layer of the OPI Infinite Shine ProStay Easy Apply & Long-lasting Gel Effect Gloss Top Coat.
Step Three
Create a crescent shape along the tip of each nail using a fine detail brush from the ASP Nail Art Brush Pack, switching between the OPI XBOX Racing Pinks and N00Berry Infinite Shine Lacquers.
TOP TIP: If you want your neon tips to really pop out, use a white nail lacquer such as Alpine Snow on your tips, wait for them to dry and apply your neon shade over it.
Step Four
Finish your neon French tips with the OPI Infinite Shine ProStay Easy Apply & Long-lasting Gel Effect Gloss Top Coat.
Take your manicure to the next level with OPI

€ 19,50
<ul><li>Matte nail polish top coat</li><li>Turn any chosen shade into a matte finish</li><li>Helps prolong the wear of your manicure</li><li>Smooth finish</li></ul>

€ 19,50
<ul><li>Nail lacquer top coat</li><li>Helps prevent smudges while drying</li><li>Dries to high-gloss, protective shine</li><li>Non-yellowing formula</li><li>Helps protect nails for longer</li></ul>

€ 19,50
<ul><li>Primes nail surface for polish</li><li>Prevents staining</li><li>Helps polish adhere better and remain chip free</li><li>Promotes long-lasting finish</li><li>Ideal for finger nails or toenails</li></ul>
Spring florals
Flowers are the perfect way to add soft spring vibes to your manicure. It’s one of those nail art designs that sounds impossible if you aren’t a professional nail artist, but all the sweet floral look requires is a dotting tool and three of your favourite shades! For our easy to follow tutorial, we’ve been inspired by the eye-catching floral colours of the brand new Morgan Taylor Full Bloom collection.

Spring flower nail art tutorial
You will need:
• Morgan Taylor Stick With It Long-Wearing Base Coat
• Salon Services Dotting Tool Set
• The following Morgan Full Bloom Nail Lacquers:
o Pick Me Please!
o Bloom Service
o Best Buds
• Morgan Taylor Make It Last Long Wearing Top Coat
Step One
File, cleanse and buff your nails before applying a thin layer of the Morgan Taylor Stick With It Long-Wearing Base Coat.
Step Two
Apply two thin coats of the Morgan Taylor Full Bloom Nail Lacquer in Pick Me Please and leave to dry.
Step Three
With the Salon Services Dotting Tool and the Morgan Taylor Full Bloom Lacquer in Bloom Service, create your flower petals by applying five small dots in a circle shape before filling in the centre area.
Step Four
Using the same dotting tool, apply the centre of your flower with another Morgan Taylor Full Bloom Lacquer Best Buds and leave to dry.
Step Five
Finish your bright floral nails with the Morgan Taylor Make It Last Long Wearing Top Coat.